Hi! My name is Kelly Donovan (aka knittingandthings) and I am a Jewelry and Mixed Media Artist. I am after
Kari Sanchez in the FIRST EVER
Creative EdVentures Blog Hop! Roberta from
Decorables and Cynthia from
Cynchronicity have honored me with this exciting opportunity to be a part of this wonderful event. I am also honored to be showcasing
Sue Miller Stamps from
Queen Kat Designs. In celebration of this event, I am offering a FREE prize to those who follow and leave comments on my blog and you can up your chances of winning even more prizes when you return to the Creative EdVentures blog and leave a comment there because they are offering free prizes too! So, please leave your email address in your comment so I can contact you if you are the lucky winner and have fun blog hopping!!!
 |
| These are what you will win! |
The first piece of wearable art I made is a necklace using Sue Miller's stamp,
Keeper of the Forrest. I wanted to show how versatile these stamps are. This is a great project for children to do with parents (with supervision) because I used shrinky dinks! First I made the picture a bit larger and printed it out on shrinky dink paper that's made specifically for ink jet printing. Once I let the ink dry, I took Copic markers and Bic Mark-its and I colored it in. I used a Black Pitt Artist pen to re-outline the few parts that didn't print. Next, I punched a hole in the center near the top of the picture, tapped some corn starch on both sides and shrunk it using a heat gun (it can also be placed in the oven if you don't have a heat gun). I used a bamboo skewer to keep the hole open while it shrunk. Once the shrinky dink was cool, I took silver tape and wrapped it around the edges of the piece and added Glossy Accents. Once it was dry, I burnished the tape and added beads and voila - a beautiful necklace! Here are the steps and a picture of the final product.
 |
| Printed, colored and cut into square |
 |
| Colored in picture before shinking |
 |
Hole punched and shrunk
|
 |
| Adding silver tape and Glossy Accents |
 |
| FINAL PRODUCT!!! |
********************************************************************************
For my next item I used the exact SAME stamp for two different pieces of art because I wanted to show you how a little imagination can go a LONG way! This stamp is called
Princess Melis. The first item I did was a box. I used an inexpensive wooden round box and used a brush to apply a coat of Inkadinkado Royal Blue Spray which dyed the wood a beautiful blue. I then sized my Princess Melis and printed it on regular card stock paper. I used acrlic paints, Copic markers, star and butterfly embelleshments and added some flowers and vines with puffy paint on the bottom to add dimension and color. I used Ranger Stickles for added sparkle and added the sentiment which I live by..."I believe in God only I spell it N-A-T-U-R-E." Once everything was dry, I painted wooden thimble spools and glued them to the bottom of the box for the legs. Here are some pics of the work in progress.
 |
| Plain chip box |
 |
| Colored-painted and cut out |
 |
| Pasted on dyed box with Liquitex Matte Gel-embellishments added |
 |
| Sentiment added and some glitter touches |
|
|
|
|
|
|
|
 |
| Thimble legs |
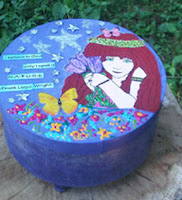 | | | | | | | | | | | | | | | | | | | | | | | |
| ALL DONE! | | |
|
|
|
|
|
|
|
|
|
|
| | | | | | | | | | | | | | | | | | | | | | | | | | | | | | | | | | | | | | | | | | | | | | | | | | | | | | | | | | | | | | | | | | | | | | | | | | | | | | | | | | | | | | | | | | | | | | | | | | | | | | | | | | | | | | | | | | | | | | | | | | | | | | | | | | | | | | | | | | | | | | | | | | | | | | | | | | | | | | | | | | | | | | | | | | | | | | | | | | | | | | | | | | | | | | | | | | | | | | | | | | | | | | | | | | | | | | | | | | | | | | | | | | | | | | | | | | | | | | | | | | | | | | | | | | | | | | | | | | | | | | | | |
********************************************************
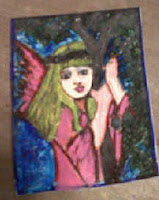
My last project uses the same Princess Melis stamp but in a completely different way - Mixed Media. It is no surprise; I would LOVE to be a GYPSY! First, I started with a small canvas and covered it with torn out sheets from an old book. I used Liquitex Gel Medium to glue the sheets down. I then took my Inkadinkado Red and sprayed the ink all over the surface of the canvas. Next, I took sequins waste and put modeling paste on it in different areas and let it dry. I then added more accents using dusty lavander distress inks, gold rub n buff to create the finished background. I took the same print out of the Princess but this time I colored her hair in black with added glitter glue and red streaks for a totally different look! I printed out the words "Gypsy Woman" and used Glossy Accents to glue the words on....I LOVE her.....This project was inspired by someone whom I love who happens to live far, far away....The funny thing was, I was originally going to throw this second print away when it didn't turn out as I planned, but I then realized - it was meant for something completely different - this piece of art! Here are some pics of the process.
 |
| Background |
 |
| Picture cut out and colored |
 |
| Finished! |
Thank you so much for visiting my blog. I want to thank Creative Edventures, Sue Miller and Queen Kat Designs for this exciting opportunity.
Remember to check out the amazing deals Queen Kat has for us in honor of this Blog Hop - 40% off all of Sue Miller's Stamps and a FREE GIFT with your order if you mention you are from our Hop! Please DO NOT forget to leave a comment on my blog along with your email address and please follow me for a chance to win my FREE giveaway. Then, don't forget to return to the
Creative Edventures Blog and leave a comment there too! Now, please continue on to the next artist in the blog hop -
Laura Davidson.


